Tutorial: How to make bootable USB drive by using CMD
Now-a-days anyone rarely uses live CD or Bootable CD to install windows or any other OS on their computer or laptop. The most used method is using a bootable USB drive to install the OS. It is very easy to create a bootable USB drive on your own. There are a lot of free tools to do this work very easily. But if you don't want to install or use any other third party tools to do this then this tutorial is for you. The bootable USB drive can be created with the help of a built in windows tool/terminal name Command Prompt aka CMD. So without any further talking lets dig in. Follow the below steps properly to build the bootable USB drive without any third party tool -
Requirements:
Before you start make sure that these things are ready -- A USB Drive: Minimum 8 GB
- A Windows Laptop/Computer: Any version of winodws will work. And also make sure that you have the administration rights of the computer.
- The ISO file of the operating system: Download the ISO file of the OS you want to install. If you want to create the bootable image of Windows OS than you can download it from here.
- A very lil bit of patience :-)
Steps:
If the above told things are ready then you are ready to go and create your bootable disk drive. Just follow these steps now -
Step – 1
- Press start and type CMD in the search box
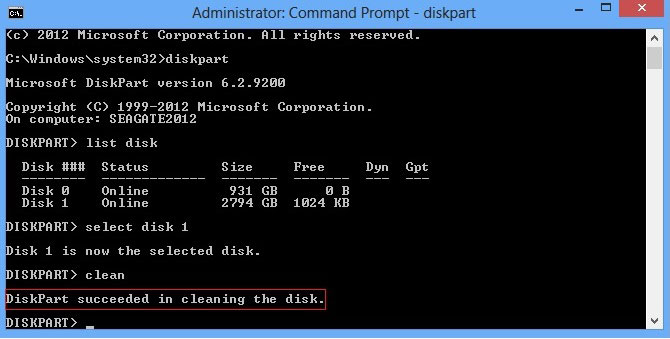
- Run CMD (Command Prompt) as administrator then type diskpart
- Then type list disk. Then select the preferred disk for creating bootable partition on that disk. As example select the disk 2.
- So you have to type select disk 2
- After that type in clean & hit enter.
- Type create partition primary and hit enter. Creating a primary partition and in further windows will recognize it as partition 1.
- Then type active
- Format fs=ntfs quick
- Exit
- Now type the DVD drive letter. Let’s assure it as f. So, now type f: and then enter
- Cd boot
- Type bootsect/nt60 d: (here d is the USB dive)
- Exit
Step – 2
- Open a new CMD and type xcopy n:\*.* k:\/E/H/F
[Note: Here n:\ means the source and the k:\ means the destination drive]
After you have followed the above steps the USB drive is ready for using as a live USB or Bootable USB Drive.
Additional Link:
 In case you don't want to use this method for making your bootable USB & just wish to use a third party tool, here is a link for downloading a great & powerful tool (Rufus). Just downlaod the tool from their site and follow the onscreen guidelines. Click on the link below to download directly or go to their Official site -
 Download Now Go to The Website
If you have any questions please comment below.
Thanks.


Comments
Post a Comment